Thursday, September 12, 2019

Mobility Series: Myofascial Release

Mobility Work
Spending time trying to improve your mobility is one of the least glamorous things the exercise world has to offer. Unlike with strength training or intense conditioning, you don’t lift anything heavy or move fast; you just sort of end up rolling around on the ground for 10 minutes wondering why it hurts so much. Despite its unappealing nature, mobility work is perhaps the most underrated aspect of fitness that people need to spend time developing.

The term mobility in this context refers to your joints’ range of motion. Having enough mobility enables you to do things like squat to depth or fully reach overhead. Many of the people that struggle to perform these basic movement patterns are unironically the ones who are least interested in foam rolling and stretching. The tighter you are, the more painful trying to improve becomes.

Myofascial Release
This process generally hurts so much for most of you because you build up a lot of stiffness throughout the day. Most of this comes from being in one static position for up to 8 hours at a time while sitting at your desk. Sitting for this long creates tension around the hip flexors, glutes, hip external rotators, quads, lower back, upper back, anterior shoulder, neck, and head; all of which are vital regions for healthy joints and effective training.

This is where myofascial release comes in as a method for alleviating that tension. It involves using an object like a ball, foam roller, pencil, or anything else you can think of to break some of the tightness up. Muscle tissue in the human body is surrounded by a connective sheet known as fascia that wraps around muscle bellies like a large casing. Whenever a muscle shortens or stays in one position for a prolonged period of time, the fascia shortens with it and will eventually become wound up into tighter tissue that we often refer to as “knots.” Myofascial release, or foam rolling, literally massages these areas of tightness to help unwind the muscles and fascia.

Implementation
Eventually, myofascial release won’t hurt nearly as much as you remove a lot of the knots and adhesions that are ingrained in your muscle tissue. Below is a video from Fitwell Trainer Liz on how you can easily perform some self myofascial release in your office.


Guidelines for Foam Rolling:
  • Roll above or below joints and on muscle only. Never on bone.
  • Apply enough pressure to produce actual change.
  • Spend 1-2 minutes on the relevant body part(s).
  • Do it 1-2 times daily.
  • If painful areas are found, dedicate more focus to those spots.
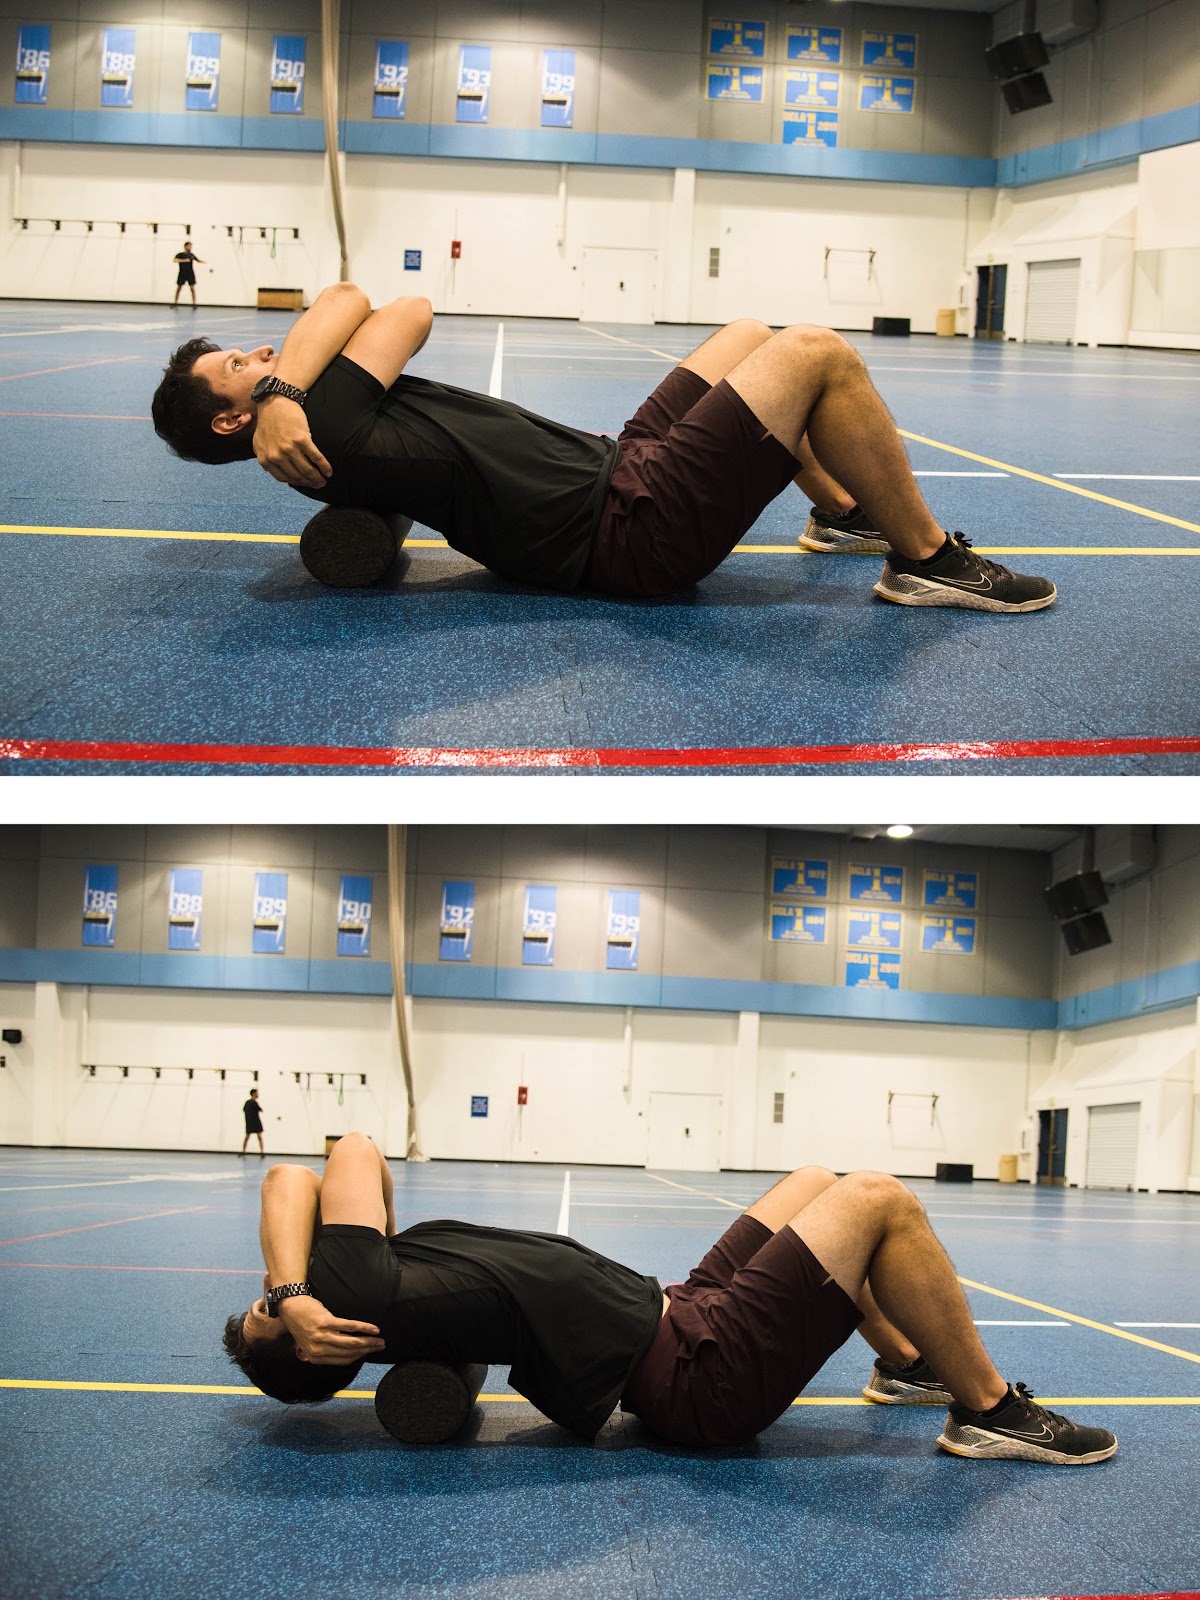
In addition, here are some basic methods you can begin incorporating regularly. Don’t be afraid to pull a foam roller out at BHIP anytime you’d like. If you have a particular question on how to tackle a certain area or improve a position, post it in the comments below.


Thoracic Extension over foam roller (Left). Hamstring Release with Lacrosse Ball (Right).


Forearm/Hand Release with a pencil.

Monday, August 26, 2019

Three Tips on the Hang Power Clean


This week we have a video addressing some tips that can help your hang power clean. Based on what we see during classes, we've picked out three areas everyone can work on.


Monday, August 12, 2019

Working Through Weakness: The Hardest Part

By Emil Chang

In high school, I had a bad case of patellar tendonitis mostly due to pretending to be good at basketball when, in actuality, I was graceless and mediocre at best. In 2015, I had a superficial surgery on my chest that limited my range of motion for almost four months. Finally in 2018, I subluxed my left shoulder bouldering. Needless to say, I had substantial bouts of time when my training was limited because of injury.

If you're in BHIP, odds are you like exercising and being active. So the hardest part about a debilitating injury is perhaps not the pain, but the mentality. It's the disappointment of not being able to lift as much as you used to, or being unable to participate in the same conditioning as everyone else. It’s frustrating. You feel physically and mentally stagnant. Your body feels bleh. It affects parts of life outside of training as well. No doubt- it’s easy to fall into a dark hole of lethargic inactivity, longing for the past when you were at 100%, pain-free, and strong.

Animated GIF

That’s one way to think of it. However, as a coach and fellow injured person, I think injury and recovery should be part of your own path to success.

proud of you yes GIF by EditingAndLayout

 Quinn Henoch (in this video) and Josh Henkin (creator of Ulitmate Sandbag and spinal surgery survivor) have both talked about injury and recovery. Basically, recovery does not have to be a complete stoppage of activity. Sure, if you injure yourself deadlifting, it makes sense to stop deadlifting for a bit, but that's not the end of the story. The world of strength and conditioning is vast, and, if you wanted to keep moving, you probably could. Instead of recovery being passive, make it active. Use recovery as activity preparing your body to be as good as it can be to perform the next day.

Say you’re like me, and you had a problem in your left shoulder. Going overhead is not good and some pushing motion hurts. That sucks. But, you have another shoulder and two legs that work fine, as well as limited range of motion in your injured shoulder that is pain-free. So guess what? You can still exercise! All while not aggravating your bad shoulder!

 Same thing goes for any injury. Your knees are bothering you? Sure, avoiding knee-dominant exercises like squats and lunges is a good idea. But, you can still improve leg strength by hip hinging and maybe even deadlifting. This can also be an opportunity to work on your upper body strength. Struggling to get your first pull-up? Maybe this is chance to refocus your training towards that. 

Everyone's bodies are different. Your version of recovery will look different from everyone else's depending on your anatomy, overall strength level, and activity. My version of recovery is going to look different from a professional athlete's version, which is going to look different from a non-active adult's version, and so on.

Working through weakness is hard. It's probably harder than working out normally. But if you believe that you can still get stronger, faster, better, and keep working at it, then you've gotten past the hardest part.


 **If you ever need tips on how to restructure your training or modifications, feel free to ask your BHIP coach. Any other questions or relatable anecdotes? Comment below!

great job thumbs up GIF

Sunday, July 28, 2019

Developing Better Push-ups Part 2

By Danny Jauregui

“There are no such thing as girl push-ups and boy push-ups; there are just push-ups and not push-ups.” -Kyle Clayton


Now that you that you have a solid understanding of the push-up, it’s time to decide on a plan that’s right for you. Two of the common themes in all of these are frequency and progression. Push-ups must be done often enough to apply significant stress and in a manner that is progressively more difficult. If you’re not improving, it is likely because you’re missing one of these two variables.


For an easier to absorb video version of a push-up progression, you can take a look at a series Fitwell did a few years ago starring former instructor Kyle.


Make your selection depending on your current starting point. Below you’ll find different progressions based on varying scenarios.


Individual can’t do a push-up or negative on the floor: 3 to 5’s
The most readily accessible solution is to elevate the hands; allowing yourself to practice a perfect plank while in motion. You could utilize a ledge until you progressed far enough to try a negative on the floor. A very simple progression on the wall is to gradually build from sets of 3 reps to sets of 5 reps. Once multiple sets of 5 are achieved, you’re ready to reduce the height of your elevation slightly and restart the rep scheme. An example of what this might look like over the course of one month is written below:


Rest 2-3 minutes between sets
Monday
Wednesday
Friday
Week 1
3x3
4x3
5x3
Week 2
2x4
3x4
4x4
Week 3
1x5
2x5
3x5
Week 4
3x3 (at a lower height)
4x3
5x3

This particular example consists of 3 days of push-ups per week. Each one is relatively low volume but the frequency of exposures is high enough to continue development. There is also a clear progression in sets or reps every single session.


This same model could also be run 2 days a week, but the number of sets could be increased to help provide adequate stress. Regardless of how many days per week you choose, the idea is to very gradually adjust your reps from 3 to 5. Moving down in height of elevation overtime is the key. When you get comfortable enough with this, you’re ready to move to the floor and try negatives.


Individual can’t do a push-up but can do a negative: Singles
As soon as you feel capable of doing a push-up negative, meaning you can lower yourself down to the bottom of a push-up in a perfect plank, you should begin to incorporate them into your program. While I’ve never implemented this movement entirely alone, I think you could develop a push-up doing nothing more than negatives. They are genuinely that effective at getting you to support your own bodyweight. The basic idea with negatives is to focus on progressing time rather than reps.

Assuming 2-3 days of push-ups per week, a basic progression would look something like this:


Week 1: 5x1 @ 2-3 seconds

Week 2: 5x1 @ 3-5 seconds
Week 3: 5x1 @ 5-7 seconds
Week 4: 5x1 @ 7-9 seconds
Week 5: 5x1 @ 10 seconds

Your progression may not look exactly like this, but as long as there is some time change week to week you will continue to get better. Typically, when you get to the point when you can do a 10 second or longer negative, you’re ready to add some difficulty to the exercise.


Individual can do a 10 second negative: Pause Negatives and Half Reps
Continue doing negatives, but add a brief pause in the most difficult portion of the movement. For most people, that will be a few inches off the floor. The pause negative can be progressed in the same manner written above, but this time increasing the amount of time you spend in the stopped position.

Also begin to incorporate half reps. To do a half rep, start in a perfect plank, lower halfway down, and then press yourself back up. I would not recommend doing solely half reps as they do not help build strength from the bottom, but replacing one negative day a week with half reps can be helpful.


Day 1: Push-up Negative 5x1 w/ 3 second pause

Day 2: Half Push-up 5x3
Day 3: Push-up Negative 5x1 w/ 3 second pause

The above progression can be run until you are capable of doing a single push-up. There’s no definitive marker for when this happens, but if you’re capable of doing a 10 second pause negative, then it’s probably time to at least give a full push-up a try.


Individual can do 1 push-up: Increasing sets and reps
Once you can do one, the formula for continually improving push-ups becomes fairly simple. You will either add sets or add reps every single time you do them, as with the first example.

The key is progression. I see a number of people regularly stuck at the same number of push-ups wondering why they aren’t getting better. If you take nothing else away from this post, then let it be this: doing the same thing every single week will keep you exactly the same as you are now.


Beyond Push-ups
There comes a point where simply adding sets or reps isn’t entirely sustainable. That’s okay because no single method will work forever, but determining where to go from this point depends on your goals. Much of this leaves the scope of this post, but below are a few potential options that may be helpful based on what you want to accomplish.

Getting Stronger/Building Muscle:

Start doing any of the following exercises in place of or in conjunction with push-ups.


  • Bench Press
  • Incline Bench Press
  • DB Presses
  • Floor Presses
  • Dips/Ring Dips
  • Tricep/Chest/Shoulder isolation exercises


Staying Healthy:

Incorporate exercises that challenge your shoulder stability and power further, such as:


  • Ring Push-ups
  • Front Supports
  • Dips/Ring Dips
  • Glider Disc Push-ups
  • Ballistic Push-ups


Getting Closer to 1500 Push-ups:

Increase frequency of push-ups and progress total number of reps done in a day. Again, this leaves the scope of this post, but 100 push-ups in a day is a good starting point. Progress reps week to week or month to month from there.

If you have questions about implementing any of these, please comment below or ask me in person (preferably comment cause you know how much I love some comments).

Friday, July 12, 2019

Developing Better Push-ups Part 1

by Danny Jauregui

Push-ups are one of the most fundamental strength exercises that you can do. Few bodyweight movements have the potential to develop musculature and improve strength in the upper body and trunk as effectively. Former NFL running back Herschel Walker has said that throughout his career he would do up to 1500 push-ups a day, and that all of his training came from calisthenics. Is he lying about that last part? Who’s to say? Whether or not he did exclusively push-ups, his proficiency with them is emblematic of how functional they can be in developing full body strength. You don’t have to be an NFL Player; push-ups are invaluable for all populations. Whether you’re trying to get that first rep or get yourself to 1500, these next two posts are for you.

The Perfect Push-up:
Before we dive into different progressions, let’s take a look at what a good push-up looks like and why it’s so effective.

Key Points:

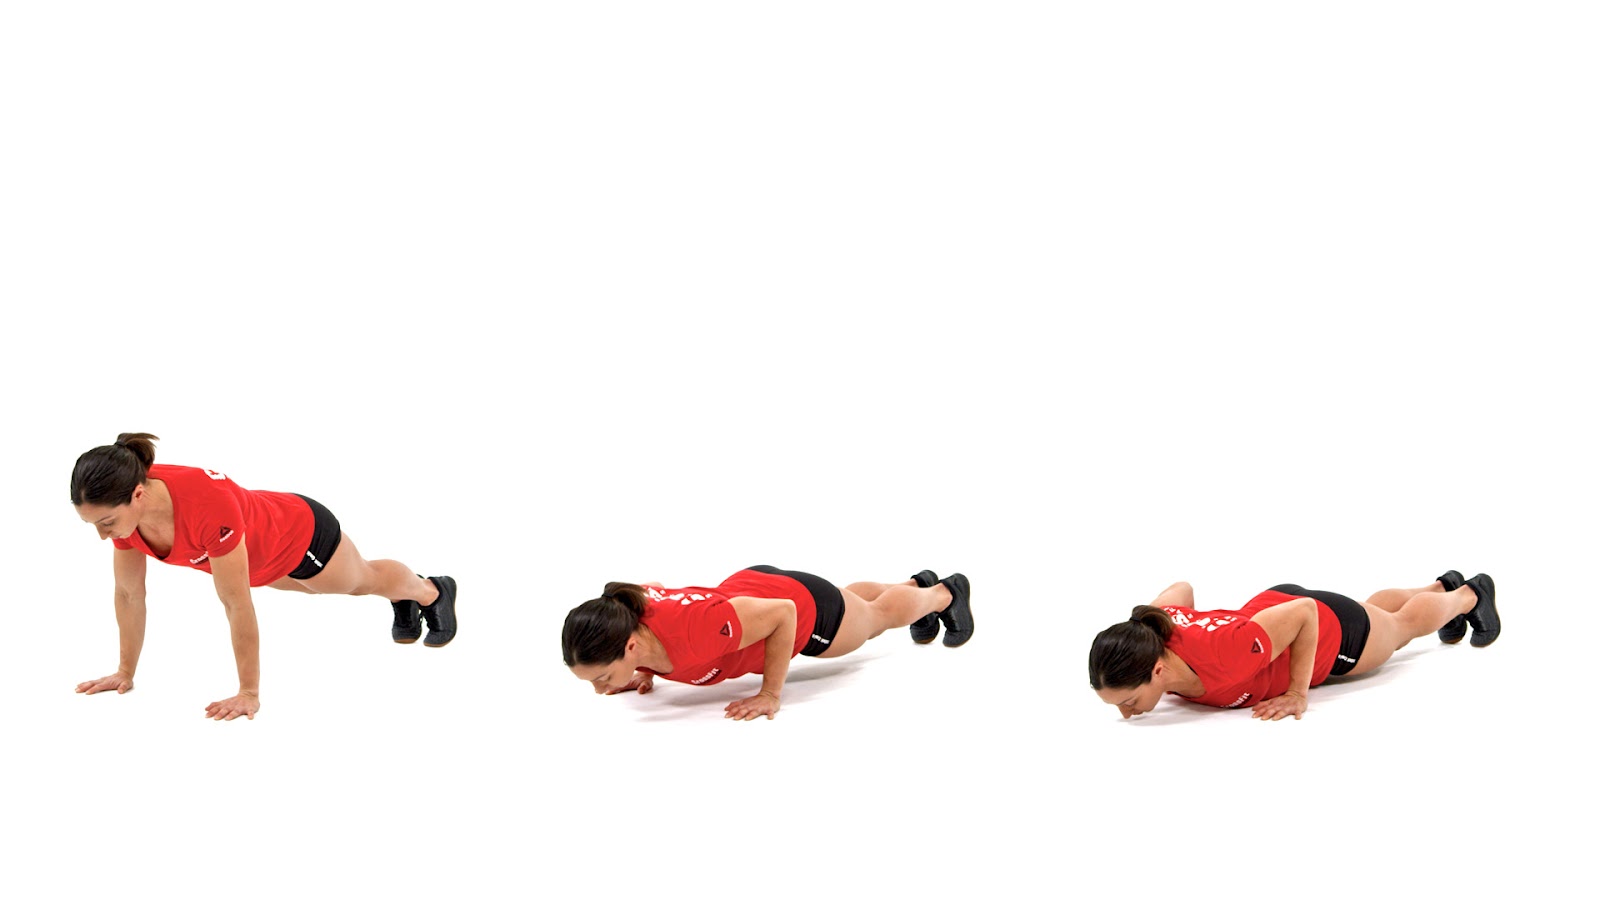
  • Hands shoulder width and in line with the chest.
  • Neutral head.
  • Vertical forearms throughout the movement.
  • Body in a straight line plank.
  • Belly and glutes tight.
  • Elbows close to the body.
  • Shoulder blades “pinched” at the bottom of the movement.

The example above illustrates all of these key points. In the first image, we see the individual in a perfect straight line. As her body descends to the bottom, she remains in that straight line and brings her shoulder blades together. Additionally, her elbows stay in tight to her body, and her chest is ultimately the first thing to touch the floor. You can look at these images in reverse to visualize how she’ll get back up.

The Most Common Errors:
When we teach this exercise in Onramp, many of us like to refer to it as a plank in motion. All you’re doing is bending through the arms and shoulders while your body stays in a perfectly rigid plank. The premise is simple enough to grasp, but the execution can be difficult. Every time you ascend, gravity wants to push your hips and belly down; resisting this tendency comes from strengthening of the abs and glutes to help maintain the rigid trunk. Whenever you’re put into a position that your body isn’t strong enough to hold, it will try to naturally compensate by reducing the load on the weakest point of the system. Allowing your hips and lower back to lose their position is your body’s way of taking load off of your shoulders. Understand that if you’re going to do your push-ups with your hips falling to the earth throughout the movement, you’ll likely get very little out of them.

Note the difference in hip position relative to the shoulders.
This is garbage.


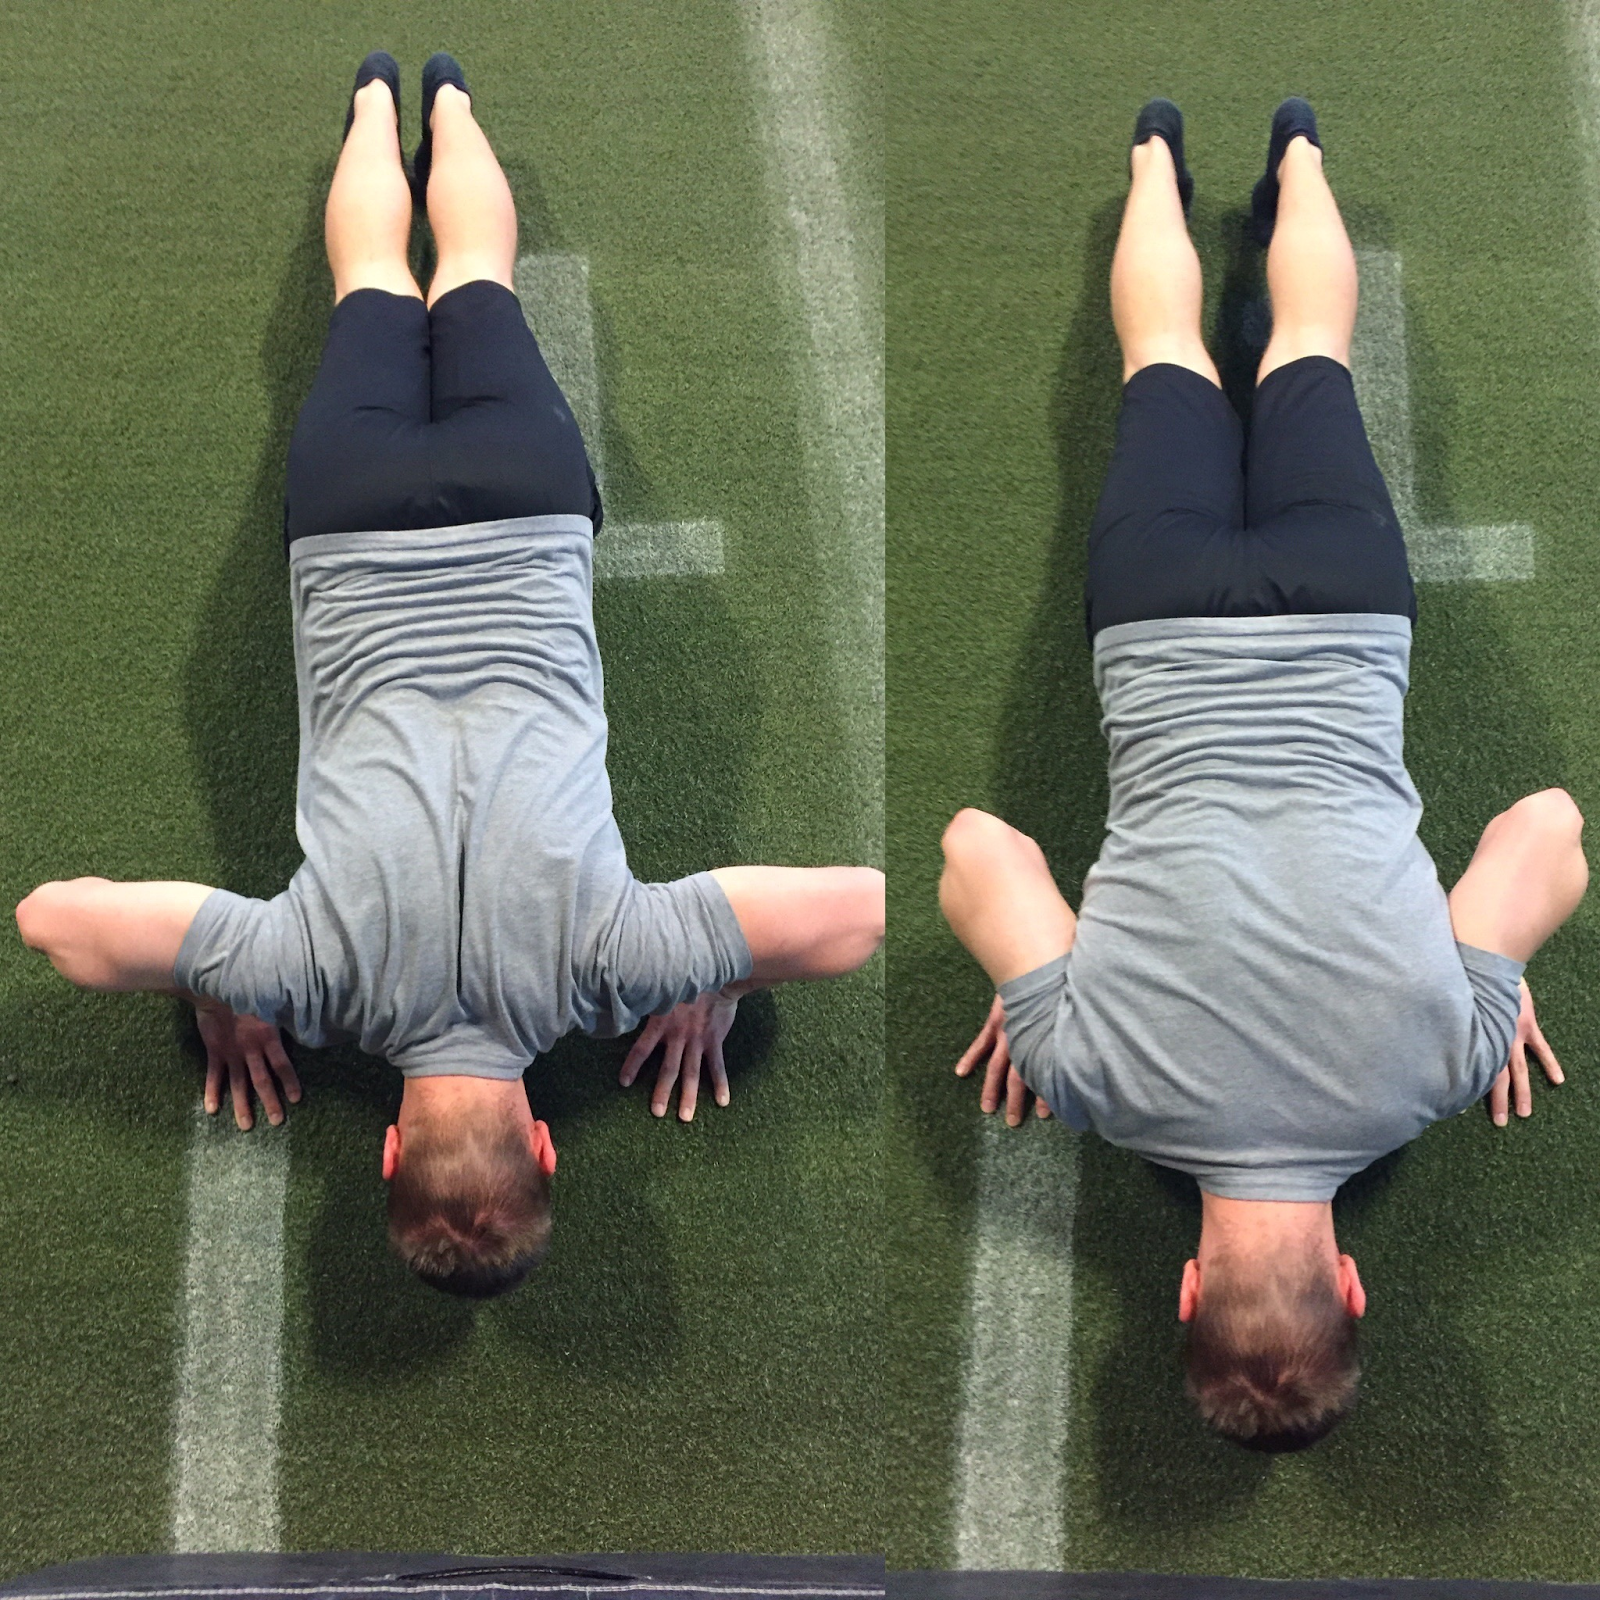
The other key point we’re looking for is good shoulder mechanics, which can be simplified into two fundamental things: close elbows and retracting shoulder blades. The first is something we preach all the time; having your elbows stacked over your wrist and close to your body (right) will allow the force of the push up to be distributed across the triceps, deltoids, and pecs. When your elbows start flaring out (left), it reduces the load on your triceps and begins to dump it more into the shoulder joint rather than the surrounding musculature. This is another poor pattern that will reduce the efficacy of the exercise as it diminishes your muscles’ ability to act on your joints.


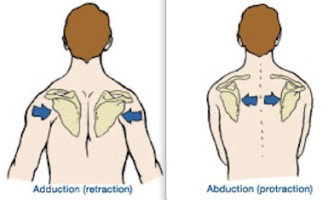
Tying into the shoulder joint, your scapula should be coming together (retracting) as you lower your chest to the floor. This retraction of the shoulder blades provides stability for the entire shoulder girdle and prevents poor positioning of your upper arm. When your scapula don’t retract, it allows the shoulder to dump into a forward position that will put more pressure directly on the joint. At the bottom of the push-up, your upper back should always be as tight as it can possibly be; that tension will provide a solid foundation to press from. When you press yourself back up, keep in mind the shoulder blades will not stay retracted, but instead come away from each other at the top of the rep.


The bottom of your push-ups should look like the left side,
while the top should look more like the right.

Given all of the musculature that push-ups incorporate, there’s several areas that may be limiting you in your quest to get better at them. And that’s okay. Regardless of what your limitations may be, you have the tools to improve yourself. Step one is to begin practicing with the solid mechanics we’ve discussed above. It may be a humbling experience if you’re not quite as good with better technique, but in the long run you will be better for it. Remember, Batman never would have rehabbed his literal broken spine without a really solid plank in his push-ups.

Batman hitting some reps in the The Dark Knight Rises.
He uses a wider hand position than I’d like, but he can do
that because he’s BATMAN.

In Part 2 we will discuss different progression options and how to actually implement push-ups into a program. Until then, start trying to do your push-ups better than you currently do, and feel free to comment with any questions or concerns below. I will respond. Probably. You can also use your email to subscribe on the right side of the page. Talk to you all next week.