Friday, November 19, 2021

Pre/Post Workout Q&A with Amy

Here are Amy's full answers from last week's Instagram Q&A. With links!

Is it bad that I don't eat before and after my workout? 
Eating before exercise, as opposed to exercising in the fasting state, has been shown to improve performance but may not be necessary unless it has been more than 3-4 hours since your last meal (in which case you will probably want to have a snack that is high in carbs, moderate in protein, and relatively low in fat and fiber so that it is digested quickly). It is recommended to eat within 30-60 minutes post-exercise to maximize glycogen storage and muscle protein synthesis. 

Creatine before of after lifting? Inside any specific time frame? 
Research is not clear whether there are any reliable differences between taking creatine before or after exercise. It appears that it is likely best to consume it a short time before or after exercise rather than a long time before or after exercise. To optimize creatine uptake, ingest supplements following a carbohydrate or carbohydrate/protein-containing meal. 

Favorite post-workout snacks to keep in your bag? 
Portable fruits like apples, oranges, grapes and bananas or dried fruit like raisins and dates which provide carbohydrate, potassium, and vitamin C; nuts which provide protein; trail mix which combines both carbs and protein; energy bars that are made from whole ingredients like Rx or Lara bars; cheese sticks with some whole grain crackers; peanut butter sandwiches on whole wheat bread; 
Here are some options from the UCLA Teaching Kitchen that provide a good mix of carbs and protein.

Thoughts on collagen and biotin supplements? 
Collagen supplementation in combination with resistance training was found to increase muscle mass and strength in a small group of elderly men, but it is unknown whether these results would be seen in healthy, young adults. Although biotin plays a vital role in your body’s metabolism of macronutrients, in absence of a deficiency (which is rare), there is no evidence that supplementation has added benefit. 

BCAAS pre, during, or post? 
There is no reason to consume BCAA supplements for enhanced stimulation of muscle protein synthesis and/or decreased muscle protein breakdown. High-quality protein in foods should be consumed to provide sufficient BCAA and leucine, as well as the other essential amino acids. For a more thorough explanation, check out https://www.gssiweb.org/en/sports-science-exchange/Article/branched-chain-amino-acid-supplementation-to-support-muscle-anabolism-following-exercise.

What's your opinion on energy drinks as pre workout? 
While consuming energy drinks before exercise has been shown to improve mental focus, alertness, anaerobic performance, and endurance in adults (largely through the effects of caffeine), they often have high levels of sugar which can contribute to weight gain and negative effects on blood sugar. They are not recommended for children and adolescents. Adults that choose to consume them, should avoid drinks that have greater than 200 mg of caffeine and avoid consuming in combination with alcohol. 

If you're eating at a deficit what's your rec for timing meals for energy during workouts? 
Eating some carbohydrate prior to exercise and during, if you are training for long periods of time, will help fuel your workout. Replenishing both carbs and protein shortly after completing your workout will provide the greatest benefit. 
You're supposed to eat carbs before you train. True or false? 
Consuming carbs before you train will help fuel muscle glycogen stores and maintain blood sugar levels during exercise. If you are training at high intensity for an hour or moderate intesity for more than 2 hours, you should also consume some carb during exercise to prevent low blood sugar and increase exercise performance. 


What if food makes me nauseous before workouts but I still need an energy boost? Low fat, low protein, and low fiber foods will empty faster from the stomach and may be better tolerated. Try eating something small that is easily digested, like a banana, applesauce, or toast an hour or two before working out. 

How soon after training should I try to eat so I get those gainz? 
Consuming 20+ grams of protein within 30-90 minutes post workout is recommended to enhance recovery and muscle protein synthesis. Include carbs as well in order to replenish glycogen stores.

If you have any more questions, list them below! Or if you'd like to talk with one of our RDs, you can find them here.

For more recipes, you visit our Teaching Kitchen schedule or classes or @uclateachingkitchen.


Friday, May 14, 2021

Rest and Recovery

By Cindy Engle

If you are in BHIP by now you most likely have seen or understand the benefits of regularly participating in a strength and conditioning program. Yes, consistent training plays a huge part in the journey to improve your health and wellness but so does proper rest and recovery. As much as we think we should just go, go, go, we also need to have time where we slowdown in order for us to get stronger and perform better.


Why is recovery important?


Repair

Strength training causes small tears in the muscle fibers. The body then works to repair the tears which is how our muscles grow. If we are constantly placing only stress on our muscles, they won’t be able to keep up with repairing the damage and eventually our performance will suffer or lead to injury. By slowing down, our muscles are able to properly repair the microtears from training and build new cells. 


Adapt

Optimal performance requires a sharp central nervous system. Our systems need time to process training. Recovery gives the central nervous system time to adapt and make any adjustments. Similar to how our brain feels after learning new information, our body systems need time to recuperate and absorb new information after a workout. 


Prevent 

You cannot put your body through excessive overload during training and then expect it to repeat the same intensity day in and day out. Inadequate recovering can begin with small issues but lead to more serious problems if continued. Recovery helps prevent illness, extreme fatigue, injury, and burnout associated with overtraining. 


Perform

More is not always better with training.  Really pushing the intensity of your workout where appropriate, has shown to more beneficial in building strength and hypertrophy than working at a moderate intensity and pushing the amount(volume) you train. By giving your body the rest it needs, it will then let you really push your intensity. Without recovering our performance during workouts suffers and we are unable to push our intensity as much as we can.


Now that you understand why recovery is important, lets go over some ways we can help our body recover. Here are 5 easy ways you can improve our recovery. 


1. Sleeping

Adequate sleep is essential for training. Sleep is when your muscles best grow and repair. Aim to get between 6-8 hours of sleep each night. 


2. Fueling

Your car cannot run on empty and neither can you. Eating a proper diet helps improve your recovery from workouts and will replenish your depleted energy stores. Staying hydrated will also help improve your nutrient uptake.  


3. Foam Rolling/Stretching

By rolling and stretching you will increase oxygen and blood flow which will help deliver nutrients to your muscles.  Need more information? There is a pervious blog post dedicated to foam rolling!


4. Rest Day

Pretty simple here. Full day of rest equals enhanced recovery.


5. Hot/Cold Cycling

Instead of taking a shower in hot water, try cycling between hot and cold temperatures. This one can be uncomfortable at first. Exposing your body to the extreme temperatures will shock your system and wake you up. The cold will help decrease the inflammation from training and increase your recovery. Try something like 30-seconds of cold followed by 2-minutes of hot for 3-4 cycles.


Long story short, taking care of your body through rest is just as important as training. Now make sure you recover as hard as you workout!


Tuesday, April 13, 2021

Returning to Training

By Daniel Jauregui

As BHIP begins its return to in person programming and classes, I wanted to do a breakdown of the training you’ll all be doing at the rig. Many of you have likely found ways to be active and exercise within the confines of your quarantine, but the stimulus for adaptation that you can provide for yourself at home might not be quite the same intensity as in person classes. It’s also entirely possible that you haven’t been able to train in any capacity for the last year, and that’s okay.

Regardless of what you’ve been able to do, you can always start improving now. Just note that as you do start to make your way back to classes and using heavier equipment, you should take things extremely slow. Training is a process that takes a long time, and you need to give your body ample opportunity to adapt to any stimuli that it’s not currently accustomed to. This means keeping your weights light, resting when you need to, and not trying to rush back to your previous levels of fitness immediately. Start easy and progress from that point.


There are 3 primary areas of focus that we’ll dedicate our time to with the in person BHIP programming this spring.


Focuses of the Program:

  1. Building Strength

  2. Developing Inactive/Weak Musculature

  3. Improving Joint Stability and Mobility


There’s some overlap between these points, but the general idea of what we’re trying to accomplish is highlighted by each one. Strength is the most important physical quality because it lays a foundation for all of the other ones. You cannot have a high work capacity without first building a base level of strength. It’s also something that virtually no one has been able to train in a year because it requires loading, and will therefore be the first point of emphasis. Some of you may have bought some 10 lb dumbbells, and while this is better than nothing, it is nowhere near the level of loading needed to create increases in strength in most exercises. Luckily, there’s lots of weights at the rig.


The second point of emphasis isn’t entirely distinct from the first, but muscular development will come more from lower intensity and higher volume exercises. It’s possible you’ve done a good job of maintaining your muscle mass and keeping relevant muscles active throughout the pandemic, but it’s more likely that you didn’t. Quarantine created an environment in which it is very easy to be sedentary for the entire day and not have to walk or go anywhere for hours. As someone who has experienced this, I can confidently say that the one hour of exercise that some people do is not anywhere near enough to counteract the effects of sitting. Postural muscles, gluteal muscles, musculature of the trunk, and probably many other things will not be where they were previously.


The last point also ties into the fact that most of us have been sitting so much. When you sit, things get both tight and weak. Your feet, ankles, and knees grow weaker because you’re literally not using them. Your hips, shoulders, and upper back grow tighter because they’re stuck in static and usually poor positions endlessly. Your main exercises and the simple act of going through gross movement patterns will help with some of this, but more activation and mobilization exercises will be necessary to help make sure you’re ready to handle more difficult positions and higher intensities. 


All of this to say that the program will be very strength focused for the time being. We’d like to give you access to all of the things you haven’t been able to do for a while. As we progress and become more conditioned to handling load and working out in masks, we’ll be able to add onto this with some other exercises and modalities. 


The Program: Linear Progression

Since you’re all just returning to lifting, the program to help you get stronger isn’t complicated; we’ll use a method called a linear progression. This means that we’ll hold most of your training variables constant, but increase the load by a small amount every time you train. This micro increase in loading between training sessions will feel negligible, but when done consistently over time, will eventually produce a big change and lead to a large increase in your strength levels.


After getting past our initial phase of training and figuring out how heavy to go, the goal will be to add 5-10 lbs to the bar every week. Here’s what a linear progression might look like for the back squat over the course of a month:


Week 1: 3x5 95 lbs

Week 2: 3x5 105 lbs

Week 3: 3x5 110 lbs

Week 4: 3x5 115 lbs


In week 1, our example lifter squats 95 lbs for their sets with ease. The next session, they decide to add 10 lbs and go to 105. This feels a little more challenging, but is still entirely doable, so from here they choose to only add 5 lbs in subsequent weeks. The difference between each training session is small, but from week 1 to week 4, this individual would’ve added 20 lbs to their squat.


That’s the general idea of a linear progression. Everyone progresses at different rates, but each of you will try to apply this model to yourself with the guidance of your trainers. Here are a few other notes to help guide you and keep your training as safe as possible in the immediate future.


Guidelines:

  • Start very light. I overemphasized this point last week because it’s critical that you all leave plenty of room for progression. Keep in mind most of you are currently adapted to no load whatsoever, so even if something feels easy, there are changes that will happen in your body to help better prepare you for when the weight actually does get heavy. Just enjoy the fact that it’s not hard right now.

  • Weight increases are optional. If you perform your sets and decide that it was too difficult for you to increase the load the following week, then don’t. You can always repeat a weight or even decrease the load and restart the process of building back up. Be as conservative as you want to with your training, and ask a trainer when in doubt.

  • Always keep the load increases small. It should never be more than 10 lbs for barbell exercises. Remember, the whole point is micro increases between sessions that add up to significant changes over time.

  • Stay consistent! We’re only training in person 2 times a week right now, and I recommend all of you do something else at least one other day of the week. If you miss one of your only 2 training sessions in any given week, that’s a great way to slow down your own progress.

  • Don’t worry about your previous strength numbers. If you stay consistent, you can get back to that point and beyond, but focus on where you are right now and what you can do to get a little better every session.

  • Lastly, keep up with your recovery. This is important in any training program and includes sleeping, eating, mobilizing, and more things that leave the scope of this post.


In our next blog post, Cindy will dive into some recovery methods you can use to help keep your body prepared for more intense training.


Tuesday, April 21, 2020

Q&A

Hey everyone, here are some answers to most of the questions from our recent Q&A. Some of the questions are more of an individual focus so a few of us trainers discussed our answers and provided the abbreviated version below. All questions are bolded, so if you're not interested in one, you can scroll down to the next. If you have another question, be sure to ask it in the next Q&A!

Q. What's your favorite part about being a BHIP Trainer?
To summarize the discussion that a few of us had, the community and participants are by far our favorite part. Being a trainer wouldn't be the same with a different group of people. We all love the group dynamic and getting to watch people develop their social relationships as the program goes on. It's also awesome to see how strong everyone is capable of being. So many participants have done things that they once thought impossible, and that is extremely rewarding to be a part of.

Q. Who's your "body goals"?
Cindy, Em, and I were all in agreement that we tend to focus on performance and not aesthetics in our training. With that in mind, none of us have anyone that is our "body goals." If we're getting stronger, better conditioned, faster, more mobile, etc. then our training is successful, but looking like someone else isn't really part of the goal. As Cindy put it, "it's empowering to be strong and to feel like my body is performing at its peak." 

Q. Handstand progressions we can work on at home?
The first step would be just becoming comfortable with being inverted. It’s definitely a foreign position for most people in the beginning. Start with getting the torso as vertical as possible with the feet on a box, bench or couch. The goal is to get the hips to the sky and walk the hands back until the shoulders and wrists are directly stacked. After that, start facing a wall and walking the feet up the wall and just practice holding wherever you feel comfortable. Eventually you want to work yourself close enough to the wall that your nose is almost touching.

Q. Recommendations for Sandbag exercises?
Check out Brute Force Training and the Ultimate Sandbag Training. Both companies provide different sandbag workouts and exercises. Brute Force has an app you can download with a daily sandbag workout.

Q. Can you give us a progression for push-ups, planks, or sit-ups?
With all of these movements, you can either progress with a variation or by changing sets/reps. To progress with variations, you simply have to try a version of the movement that's harder than what you're doing. Stuck on a wall for push-ups? Try negatives on the floor. Stuck on a certain number? Try a different version like archer push-ups or ring push-ups. There's even ballistic push-ups. We could go through a similar thing with planks and sit-ups, but the point is different variations will strengthen the movement in different ways, and you can incorporate any of them. Alternatively, you can stick to one variation and very gradually increase sets and reps over time. Nothing too complicated about that, just be sure to challenge yourself and do the movement often!


Q. What fitness sites/blogs do instructors follow?
Here are a few resources me, Cindy, and Em follow. A brief description of each and link are included.
  • Juggernaut Training Systems (JTS) - Resource for all topics, but especially strength training.
  • Catalyst Athletics - Weightlifting resource with information on training, recovery, and movement.
  • The Ready State - Mobility and movement focus; hundreds of vlogs and movement demos on the site.
  • Brute Strength - Website and great podcast on psychology, performance, and training struggles.
  • 70's Big - Strength and conditioning site with tons of articles.
  • Eric Cressey - Specializes in shoulder rehab and performance; very active on social media.
  • Ben Bergeron (Crossfit New England) - Podcast called "Chasing Excellence" with lots of wonderful information and a focus on the mental side of training.
Q: Does BHIP offer one on one zoom training sessions?
Yes, UCLA is currently offering one on one personal training sessions. The sessions are charged per hour, but if you're interested in pricing information or trying it out, you can contact us and we'll help set you up with a trainer!

Q: How do you get that awesome spotlight effect in the weekly workout videos?
One day, while in Pardee Gym, most of the lights accidentally shut off, leaving one spotlight in the middle of the room. Em and I happened to be there and thought it looked cool; so here we are now.

Q. What set/rep/% progression patterns do we use in BHIP if we want to continue on our own?
Most people don't have access to any significant form of loading at the moment, but if you're one of the lucky few that do then this is relevant. Discussing the details of the Ongoing program would take a bit more time than this response affords. In general, however, there are a few guidelines to keep in mind.
  • Weights lifted in the 70-80% range can consist of sets of anywhere from 6-10 reps. 80-90% is more likely 3-5 reps. 90+% would be 3 or fewer reps.
  • It's typically a good idea to progress from higher volume, lower weight to lower volume, higher weight as time goes on. So using the above percentages, you could start with higher rep ranges around 70%, and over the course of weeks/months add marginal amounts of weight and decrease the reps.
  • The most important principle is progression. If there's no progression, there's no strength gain. So whatever approach you take, progress every single week in some way. 
Thanks to everyone who submitted a question! We hope to hear more in the future.

Saturday, March 21, 2020

How to Stay Fit and Safer at Home

By Daniel Jauregui

The good thing about the world changing so drastically is that you still have plenty of time to exercise. You may find that difficult to do while you’re quarantined in your home checking the news every half hour, but there are actually a number of things that you can use this time to focus on. You will maintain a good deal of your fitness simply by continuing to move daily! Don’t use the coronavirus as an excuse to get lazy.

Equipment:
If you’ve kept up with any of the socials, then you know that we’ve begun implementing at home workouts for BHIP. Currently, these workouts revolve around bodyweight movements or exercises that can be done with odd objects (like a backpack). So at minimum, you already have the basics you need to get started. Moving forward, we will plan occasional workouts that center around fitness equipment. That’s not to say the movements can’t still be done with odd objects, but it would behoove you to look into purchasing the following implements while quarantined. We won’t officially begin using any of these until Monday 3/30.

An example of an odd object.
  • Dumbbells/Kettlebell
  • Resistance Loop
  • Resistance Tube
  • Door Strap
  • Pull-up Bar
  • Jump Rope
Dumbbells are the most expensive thing on this list, but everything else can be found at a relatively affordable price on amazon. You can even find a decent quality, easy to install pull-up bar for under 30 dollars. Don’t feel pressure to get everything on the list (you can always use different implements), but having any of these items around your home will only help.


Training Tips:
1) Do the BHIP at home workouts. A week’s worth will be sent out via email every Monday, and each individual workout will be posted daily. You can do them while you watch tv if you’d like. Or you can zoom and watch your friends do it at the same time. You can read a book for all I care. It doesn’t matter. Just do the workouts!

2) Do more push-ups. If you’re bad at push-ups, there has literally never been a better time to get really good at them. As a starting point, aim to complete 50 reps throughout the day a few times a week. Elevate your hands on a countertop if you need to. Once you can do it in a couple of sets, add reps or lower your hands a bit. If you’re going to take on this challenge, I recommend getting a resistance tube and doing regular banded pull aparts/rows to have some balance around the shoulder.


“Show me someone who can do 30 pull-ups, and I show you someone
who doesn’t have a problem with the way they look.” - Rus Tokman


3) Improve your pull-up. If you have the means to access a pull-up bar during this quarantine, I think it’s the single most useful piece of equipment you can get. If you’re still working on getting the first rep, you can do a few negatives throughout the day a few times a week. If you already have the first one, then set a number of reps to achieve throughout the day, as with push-ups, and try to increase that number over time.


4) Enhance your stability with some unilateral work. Since you don’t have access to heavy weights that recruit maximal muscle fibers, you can increase your motor recruitment with single leg variations. Muscle activation can be comparable to that experienced while training with heavier loads thanks to the stability demands of single leg exercises. We’ll incorporate exercises like single leg sit to stands and single leg RDL’s into your home workouts occasionally, but doing a few reps on your own a couple of times per week won’t hurt.

5) Condition. There’s no excuse to not do this. You need nothing more than your bodyweight and some effort to get you out of breath. Improving your conditioning will help increase your work capacity and make it significantly easier for you to jump back into BHIP workouts whenever we do resume. At minimum, do the programmed at home workouts with as much intensity and effort as you can muster.

6) Set goals for yourself. You will need something internal to keep you motivated during this time. Setting a goal for yourself will give you the direction and focus you need to get through these workouts without all of your friends constantly there to do it with you. Whether your goal is to get a pull-up or improve your balance when you stand on one leg, pick something and focus on it. Then you can show all your friends how fit you are when you get back.

If you have questions about how to implement any of these at home training strategies, comment on whatever platform you find most convenient, and I’ll respond. Probably. Remember to wash your hands. See you all soon.

Thursday, March 5, 2020

What is Olympic Weightlifting?

By Daniel Jauregui

With our first weightlifting clinic fast approaching, we’d like to take the time to clarify what olympic weightlifting actually is. If you haven’t been involved with them before, the names of various strength activities can all be very confusing.

The Sport:
Olympic weightlifting, or simply weightlifting, specifically refers to the sport in which athletes compete in the snatch and clean and jerk. You might immediately be wondering, what is a snatch? Excellent question. We’ll dive into that in a second. But first, understand that the term weightlifting refers specifically to these three movements. This term shouldn’t be confused with powerlifting, which instead is a sport focused on pure strength movements like the squat, bench press, and deadlift. It also shouldn’t be confused with generally lifting weights. Doing a bicep curl doesn’t make you a weightlifter.

The sport of weightlifting is predicated on taking a loaded barbell and putting it over your head. In the first lift, the snatch, this is to be done in one fluid motion without the bar ever stopping to rest on any part of your body. The second lift, the clean and jerk, differs in that the bar is brought overhead in two separate movements. It is first brought up to the shoulders (the clean) and then taken overhead (the jerk). As fascinating as this must be to read, it’s much easier to understand with a visual.

The Movements:
Here is a video of prominent U.S. weightlifter Mattie Rogers snatching up to 105kg/235lbs.


The next video provides a demonstration of the clean and jerk. This is Kuo Hsing-chun, a Taiwanese weightlifter who weighs just under 130 lbs. Here we see her clean and jerking 135kg/297lbs.


You’ll notice in each of these videos that the lifters move with tremendous speed. Each of them takes the weight and throws it over her head in the blink of an eye. This is one of the defining qualities of olympic weightlifting. It isn’t only about how much force you can produce; it’s about how much force you can produce quickly. This fast expression of strength is known more simply as power. The most successful weightlifters in the world are all extremely powerful; not to mention technically proficient. These movements combine several different motor patterns into one fluid motion. For example, the clean involves a deadlift to get the bar off the floor, a front squat to stand up with it, and then the jerk takes you into an overhead movement.

This combination of multiple athletic qualities working in coordination with one another is one of the things that makes the olympic lifts difficult to master, as you may have experienced with your own cleans in BHIP. Additionally, the lifts put you in extremely demanding positions. In the clean alone, excellent mobility is required at the shoulder, elbow, and wrist, and that doesn’t even begin to get into the demands of going overhead or squatting. For this reason, the Olympic lifts are absolutely not for everybody. However, there are elements of the lifts that can be useful in everyone’s training.

Purpose:
The primary benefit to training these movements is power development. Rate of force production is typically the fastest diminishing quality as people age. Training power development helps preserve the ability to move quickly. If you don’t want to continually get slower and slower as you age, it would behoove you to do some sort of more explosive and dynamic training. This is the chief reason why we implement cleans regularly at BHIP. Additionally, the complexity of the movement lends itself well to the overall improvement of motor control and coordination.

Once proficiency is developed, the olympic lifts can be extremely rewarding and even fun. The problem is that it can be very difficult to become proficient with the movements, which is why we’re doing our first weightlifting clinic this weekend. Within the context of a single BHIP workout, we don’t always have time to break down every facet of the movement and reintegrate the many components together, but we will have ample time in the clinic with that as our sole focus. So if you’re someone who has struggled to grasp cleans or someone who is interested in learning more about the olympic lifts, join us on Saturday 3/7 from 10am-12pm. Hope to see you all there!

Friday, January 31, 2020

Improving Grip Strength

By Emil Chang

Can’t PR your deadlift because the bar is falling out of your hands? Having trouble doing pull-ups because you’re slipping off the bar? Maybe you’re stalling on your presses? It sounds like you need to improve your grip strength.

Importance

Hands connect us to most objects we interact with during the day. We need to hold, push, and pull objects all the time. Although they're probably not shaped like a barbell, they still depend on our hands and fingers working properly. If we spend most of the day on the computer and in the car, our fingers and wrists are stuck in relatively the same position. Keeping our hands strong and healthy is important not only to lift and carry heavy things, but also to maintain functionality.

In terms of exercise, grip can be a frustrating limiting factor. For example, you may have the leg and upper back strength to pull a 315lb deadlift, but if you can’t hold onto it, then what? You lose a percentage of force transfer with poor grip. Just like abdominal bracing or upper back tightness, grip is a point in your lift where you can potentially leak energy.


high five scott disick GIF


Programming

Improving grip strength will ultimately require an increase in frequency. While grip can fatigue quickly, it also recovers quickly. This makes it optimal for higher frequency training- something like 3-4 times a week. Grip training should be an addition to your normal workout, usually as an accessory. It’s a small and specific muscle group that is an accessory to many movements, but not neurologically or psychologically taxing enough to warrant a dedicated day of training. That being said, if you are doing heavy deadlifts, pull-ups, rows, or other grip-heavy exercises, you probably want to wait until after to do grip work as to not affect the day’s main training.


Exercises

Many of these exercises can be done for time or until failure and can easily be placed at the end of a workout. Think 20-30sec range with a moderate to heavy weight for 3-4 sets. Usually, you want it to be challenging enough to feel a decent amount of fatigue by the end of the set.


Regular Farmer Carry: With a neutral posture, grip the kettlebell with your thumb around the handle. Keeping your shoulders active, walk for a distance or simply hold the kettlebells in place. If you’re using a heavy weight, go for 10m at a time. With a lighter weight, go longer. 

Vertical Dumbbell Carry: With neutral posture, hold the dumbbell with an open palm grip. The wider spread will require you to really squeeze with your fingers to keep the dumbbell in place. Again, walk for distance or hold in place. 

Pinch Grip Carry: With neutral posture, grip a weight plate with your thumb on one side and your fingers on the other. Try to keep your fingers acting as one unit. Pinch the weight plate between your thumb and your fingers to keep it in place. Walk for distance or hold in place.

Bottoms Up Carry: There’s an added shoulder stability factor in this one and your grip strength will be crucial to keep the kettlebell in place. Make sure your wrist, elbow and shoulder are in line and try to keep your elbow at ninety degrees. 


 In both these landmine exercises, you’ll be holding onto the sleeves of the barbell (where plates are usually loaded). Since the diameter is wider than the shaft of the barbell, you will take more of an open-handed grip, which will be more taxing

Single Leg RDLs- Face your body parallel with the bar. Hold the sleeve of the barbell with your opposite hand or with both hands and perform a single leg hip hinge with the leg further away from the landmine. Keep your hips and shoulders square as you hinge.

Single Arm Bent Over Rows- Face your body parallel with the bar. Take a strong hinged position and perform a row with the arm closer to the landmine.
Image result for grippers
Hanging: Just hanging from the pull up bar can also build grip endurance. Make sure your entire hand is wrapped around the bar and you aren’t just holding on from your fingertips.


(Bonus) Grippers: There are also products like this that are built specifically for grip strength. These are small so you can use them in the office. Think of them as really hard stress balls.


In Conclusion 

These are just some examples of grip-focused exercises. Sprinkle these into the end of your workout, on recovery days, or even between sets of non-intensive grip exercises like back squats. As with anything, you have to put time in to actually make improvements. 

Isolating grip training is a rather advanced concept. It means you’re competent enough in your main lifts and movements to start worrying about little things. But, as Coach Wooden said, “Little things make big things happen.” So, if you’ve identified grip strength as a weak link, that’s great. You’re probably already pretty strong and dedicated to improving your fitness. Now, you just have to hold on.
huddle up go team GIF by MANGOTEETH

Tuesday, January 14, 2020

3 Fitness Tips for the New Year

By Daniel Jauregui

I’ve never liked the idea of New Year’s Resolutions. If you wanted to commit to doing something, you probably wouldn’t wait until the first of January to get started. Nevertheless, everyone seems to be more willing to try to develop good habits at this time of year. So with that said, here are 3 tips to help make 2020 a better and healthier year for you.

1. Start training at least 3 times a week.
Several of you are already doing this, so great work! But if you’re training fewer than 3 times a week, it's likely you’re not reaping all the benefits of exercise. These include (but are not limited to) improved body composition, higher metabolism, improved hormonal profile, reduced risk of heart disease, more strength, better cardiovascular endurance, and the list goes on. If you’re only spending 1-2 days a week exercising, the lack of frequency can slow or potentially stall performance progress you’re trying to make. In 2020, work to increase your overall physical activity, and start setting aside a minimum of 3 days for training every week. If you’re already doing that, try to set aside 4 or 5.

2. Set some realistic performance goals for yourself.
Many people measure the efficacy of their workouts with things like how hard it felt or how sweaty they got or how sore they were the next day. In my experience, none of these are all that useful. The only measure of an effective workout is whether or not it actually contributed to getting you better at something. What that something is is ultimately up to you. In BHIP, we’re constantly trying to improve your capabilities across different modalities, but that doesn’t mean you can’t have your own individual focus. Whether you want to improve your number of push-ups, increase your deadlift, or run a mile faster, you can always get better. Having a goal will also help to focus your training. Rather than going through the motions and trudging along, you will have a purpose that you’re training for. The key is to make your goals performance oriented. Stop worrying about how much you’re sweating and start trying to improve what you can do. If you’re not sure how, we’re here to offer suggestions!

Image result for thumbs up kid gif

3. Improve the quality of your recovery.
In 2019, probably for the first time in my life, I found I wasn’t recovering enough from my training. My knees became constantly achy, body fatigued and weak, and nagging pains plagued much of the exercise I did. There were several things contributing to this, but what it boiled down to was the very low effort I put into my recovery. I wasn’t making time for stretching or foam rolling, wasn’t sleeping enough, and was pretty much eating what was convenient. I’ve seen patterns like this one repeat themselves in many BHIPers and other clients I work with. Anyone that neglects recovery, regardless of age or capability, will eventually get to a point where injuries and irritations easily develop. If you’re training regularly, then as much time as possible should be spent focusing on what you can do to continue performing well. It is during this recovery time that growth and progress actually occurs. Exercise is the stress that breaks your body down, but recovery is what allows your body create adaptations that improve your fitness. This includes stretching/foam rolling to reduce the tension and inflammation surrounding your muscles and tendons. It also includes getting the optimal amount of sleep, which most research seems to indicate is between 7-9 hours for the average person.

Doing all of these things may not always be convenient, but progress has never been easy. Comment below with any questions or other habits you’re hoping to develop in 2020.

Monday, December 23, 2019

Staying Active Over the Break

Two weeks away from BHIP might feel like years, but don't fret! There are ways to stay active to make sure you start 2020 feeling fit and ready.

lazy the simpsons GIF
(not this)
Here's some workouts you can do at home. All you need is some space and maybe a resistance tube. Each workout should take around 20 minutes. Remember, every workout should begin with a proper warmup to prepare your body for activity.

Warmup Guidelines:

  • Open your shoulders and hips with arm and leg swings. These can be done vertically and horizontally for about 15-20 reps per side.
  • Reestablish your trunk stability with your favorite core exercises (planks, side planks, deadbugs, hollow holds). These can be done for a few sets for 15-20 seconds at a time as part of the warmup.
  • Include 10-15 reps of a few of your favorite body weight movements (squats, lunges, push-ups, hip bridges, jumping jacks, etc.)  


Don't have time to work out? Here are some things you can do every day to keep moving:

  • Try to get 10,000 steps a day. Split up your time watching Netflix with the fam with a walk around the block!
  • Accumulate 2-4 min of plank through the day. You can split this up with 2 sets in the morning and 2 sets in the evening. Scale to your liking. 
  • Accumulate 50-100 squats through the day. Same idea- split them up through the day. You can do this with any simple bodyweight movement, like push ups. 
  • Start the day with a two minute warmup- do some cat-cows, downward dog, half kneeling. Take some moves out of our standard BHIP warmup. 
Have any other suggestions? Put them in the comments! 

Wednesday, November 27, 2019

Thursday, October 31, 2019

Scary Stories from Strength and Conditioning

By Emil Chang

Brace yourself for some short scary stories inspired by some fitness myths floating around the internet. In the spirit of Halloween, we’re going to talk about why these statements are (mostly) false. Full disclaimer: each of these myths could warrant their own posts, but we’ll keep it brief for the time being.


Once, there was an Exercise Witch who patrolled the realm of Drake Stadium. She cursed the exercisers to always feel sore so that eventually, they thought feeling sore was just a part of working out.   

Myth: You need to be sore to have had a good workout 
Soreness is just your body reacting to something it has not adapted to. This can be a new movement or an added load to your lift. You can still get a good workout without getting sore, but getting sore is usually an indicator that you’re challenging yourself during your training session. 


Ghost GIF
You climb up the Drake Stadium Stairs and look across the way but there is no end in sight. You have to keep running up and down this endless Drake Snake to stay alive! 


Myth: Cardio is the only way to lose fat
The most important factor in fat loss is nutrition. Sure, cardio is good for you, but no amount of running, biking, rowing, or walking will be effective without the right diet. Strength training can also help with fat loss by increasing lean muscle mass, which benefits your overall metabolic rate. However losing fat can only happen with a focused diet. 

Image result for mummy workout gif


Legend has it that one day Joe Bruin lifted a ten pound dumb bell and his arm tripled in size. 

Myth: Strength training will make you bulky 
 Gaining muscle is a combination of two things: exercise and caloric surplus. Both these things have to be done with the intention of getting “bulky” for it to actually happen. The exercise has to be done with enough frequency and volume to tax your musculature. The caloric surplus means you’re supplying your body with enough nutrients to sustain your daily activity AND surpass the deficit you’ve created from the exercise. Just strength training will not make you “bulky”. If you still have doubts, google what Dwayne Johnson has to eat to maintain his size. 


DILLON StickerHere lies Josie Bruin, whose bones crumpled to the ground after performing one deadlift. 

Myth: Weightlifting is bad for joints 
It’s not. It increases bone density and, when done correctly at appropriate intensities, will support bone and joint health. Of course, this is all done through progression and patience. Lifting too much weight before your body is ready for it or lifting with improper form can hurt. However, lifting through appropriate programming and mechanics will strengthen skeletal structure. 

Mood Omg GIF

 Hope you enjoyed this short post. Have a safe Halloween!

Monday, October 21, 2019

Choosing Footwear for Training

By Emil Chang and Daniel Jauregui

The key considerations for choosing training footwear are the tasks you’re trying to accomplish and the mechanics of your feet. We can divide most training shoes into two general categories based on the activities they’re best suited to: lifting and running.

Lifting Footwear
In strength training, we’re looking for the most stability possible. There’s a reason we squat heavy on very solid ground and not on yoga balls; this logic should carry over to your shoes. For lifting, the most optimal shoe will be one that doesn’t compress and that gives your feet a solid connection to the floor. This leads to two main options for strength training: minimalist shoes and weightlifting shoes.

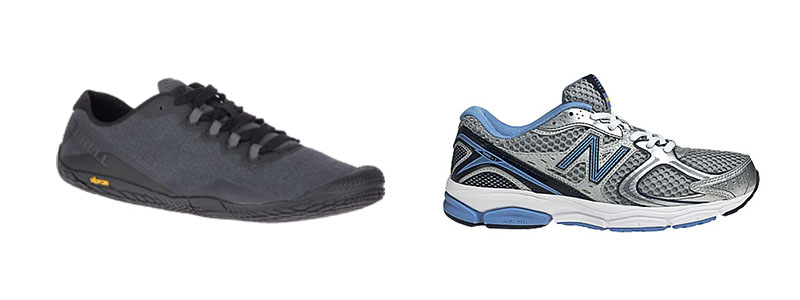
Minimalist shoes provide the minimum amount of support possible so that you can press through the ground effectively. Additionally, they are relatively flat and have larger toe boxes. Having a flat sole allows your feet to maintain its arches while the toe box gives your toes more ability to spread. Generally, these are good shoes for individuals who spend most of their training time lifting, but also for anyone looking to improve the function of their feet and connection to the floor.

Below are a few minimalist shoe options that you may want to look into if you’re still lifting in very squishy shoes.

Minimalist Shoes:
  • Newbalance Minimus
  • Reebok Nano
  • Nike Metcon
  • Lems
  • Merell
  • Nobull (I don’t know what part of this should be capitalized because it’s a dumb name)

Note the first time you wear a more minimal shoe, you may find that your feet are sore for the first few days. This is a common effect and is a result of the musculature of your foot finally being used to stabilize your arches instead of just collapsing into some cushiony support. So... when changing shoes, be cautious. To lessen the likelihood of injury, wear them for short periods of time, over time. It may take anywhere from weeks to months to acclimate to the new shoes depending on the strength of your foot and type of shoe previously worn.

The other subcategory of shoes for strength training is actual weightlifting shoes. These are specialist shoes designed specifically to optimize your leverages in squatting and the olympic lifts (snatch and clean). They do so by providing a sole that is virtually non-compressible and an elevated heel. If you’re looking to get more serious about lifting, they may be something to look into, but they are by no means a necessity for the average training population. If you do ever decide to use them, understand that these shoes aren’t for walking around in or doing bicep curls; they serve a very specific purpose: maximizing your force output. With that said, these shoes are an excellent option for anyone hoping to improve their squatting mechanics/strength.


Running Footwear:
There is a slight controversy in the running world regarding running shoes. Should you wear thin, minimalist shoes without much cushion and zero heel drop (height difference between the heel and toe) or traditional running shoes with plenty of cushion? The answer is it depends, which is unsatisfying yet true. 


The first option, minimalist shoes, can work very well for running when good mechanics are utilized. A detailed discussion of mechanics leaves the scope of the post, but when using minimalist shoes you essentially want your foot to strike towards the ball of the foot and underneath your center of gravity. This allows the natural spring-like shock absorption system that your lower body possesses to take effect.

The more common running pattern people gravitate towards is a heel strike with the foot reaching out in front of the body. This method puts a tremendous amount of strain on your joints and musculature as there is little to no shock absorption happening each time the foot hits the floor. Instead, this is where a second shoe option comes into play.

Traditional running shoes
allow relatively injury-free running and can accommodate various biomechanical restrictions thanks to the significant degree of support they provide. They possess cushioned soles that absorb impact and can be beneficial for runners with a strong heel strike. However, the high heel drop perpetuates this heel-strike and the cushion limits full foot engagement.


The shoe you select ultimately depends on your own mechanics and feet. If you’re currently a traditional shoe-wearer and want to transition to minimalist, consider easing into it and allowing yourself time to acclimate to the reduced support. And don’t do it if you aren’t simultaneously trying to improve your running technique. Running with a pronounced heel strike in minimalist shoes can and likely will lead to chronic lower extremity issues. 

It’s important to note that shoe selection for various tasks is significant, but spending time outside of those shoes is equally important. Becoming dependent on shoes that you feel comfortable with is easy. However, spending more time barefoot can help your foot maintain much of its strength and form and can prevent the development of many issues.

Check out this playlist for some foot strengthening exercises.


Shoe Preferences from some of your Fitwell Trainers:

Elisa Terry (Expert Witness) - “As you can see, I wear Newbalance Minimus.”

Liz Au (Personal Training Coordinator) - “For running I like Brooks. For anything else, Chucks. I like to swim barefoot.”

KC Reischerl (Former Broadway Actor) - “I use Nanos for lifting, and Asics for Cardio. I have wide feet and am on my feet all day so I spare no expense.”

Vikram Prathap (Trainer) - “I wear Nobulls. Or something flat. I can ball in anything.”

Cindy Engle (Trainer) - “My favorite shoe for working out is the Reebok Nano 2.0. It’s light, flat, and a little wide. I feel supported during Olympic Lifts, can perform plyometrics in them, and at the same time I can run short distances and feel good.”

Rob Sanchez (Trainer) - “For sprinting I warm up with no shoes then switch to Vibrams. For lifting, I use flat shoes like Metcons or even go barefoot.”

Justin Lui (Trainer) - “For weightlifting I use Vans or Converse. Especially for deadlifting. I like a flat shoe but I can squat in anything cause I’m pretty mobile. I don’t do cardio.”

Em Chang (Filmmaker) - “I’ve worn Crossfit Nanos for the last six years. They’re good for lifting and if I ever happen to do short running, they’re fine for that. Plus they look okay.”